Tuesday, January 31, 2012

DIY braided bracelet: EASY

Hello lovelies, today I have a very exciting post for you all, well at least I think this is exciting lol, I love anything DIY and a few days ago I made some bracelets that I think are super cute and fun.

It is super EASY to create this bracelets and the best part is that you can switch up your materials and create something according to your taste ;) so lets get started..
what you will need.
all you see is a regular 3 strand braid, but you put a bead on strand #1, which of course becomes strand #2 when braiding, then a bead on strand #3, which also becomes strand #2 when braiding.
Before reaching your desired length, make another 1 or 1/12 inch braid (depends on your desired length) then make double knot, (big enough to fit in the loop you did at the beginning) and not come undone when you wear it.
I hope you enjoyed this super easy DIY bracelet, and if you get a chance to try it out don't forget to share, or tweet me a pic @Kmanzo01
Have an awesome day
xoxo Karen,

Thursday, January 19, 2012

OMG! I'm at almost 100 followers!! yey

helloooo lovelies. So I am at almost 100 followers, and that is a lot to ME being that I don't update my blog as often and I haven't been able to post content I'd like, but I am going to try my best to make my blog more fun ;) and I am at 97 followers and this month completes my 1st year of blogging. Time went by crazy fast!!!!! So I will have a GIVEAWAY within a week or two to celebrate this :D I hope a lot of you enter it when is up. So I am going to buy a couple more things so I can have a nice GIVEAWAY. Thank you so much to all you who have followed me and like my blog. I love you all!!!! hugs and kisses, and check back soon for my GIVEAWAY post ;)
have a wonderful day
xoxo Karen,

Sunday, January 8, 2012

New Maybelline Dream Nude Airfoam foundation!!!

Hello everyone ;) so a few days ago I stopped by the local Target and I saw a few new makeup displays and when I see new I get excited lol. So I love maybelline and I saw a new foundation they came out with which is the Dream Nude Airfoam foundation. I couple of weeks ago I saw the new mousse foundation from Revlon but honestly I hear people say you can see small shimmers in that foundation and I really dislike that so I gave the maybelline foundation a try. I paid $8.99 for it and the shade I chose is #265 Sun beige which at first I wasn't sure if I should get because since its a metal container you can't see the actual product. Well I am glad I chose that shade because it matched me perfectly and that comes as a surprise because it's hard to find a drugstore foundation that matches my skin that good, I have a lot of yellow undertones. I applied this foundation using the ELF powder brush, which is the flat top one, and it was the best choice. That brush allowed me to blend the foundation onto my skin really well. the foundation is super easy to work with and it's really cool because it's a mousse. It gives a nice natural finish, not to matte or dewy which I like because I m not a big fan of dewy foundations. The weather definitely allows me to use different foundations because during summer time I have to stick to the Revlon Color Stay for a good matte finish and because it is long lasting. The Dream Nude Airfoam foundation lasted a good 8 hrs on my skin, I didn't touch up with powder throughout the day, which I was surprised about that but it's a plus.
Before applying this foundation I made sure to exfoliate my face because flakiness would look horrible specially with this type of foundation. I also don't have acne scars (or acne)and I also don't have many blemishes to cover. this foundation is light and great for everyday use...(so far) it feels like it. My skin is not sensitive so I highly doubt this would make me break out, but I will update for any changes :)I feel as if it does a good job at evening out my skin tone and helping my skin look healthy. I hope my initial thoughts don't change, but for now I think this will be my every day foundation. Have you tried it?
Don't forget to check my new video where I talk a bit about it and also show how I applied it.

xoxo Karen,

Wednesday, January 4, 2012

My 1st tutorial of 2012


Hello everyone today I decided to film my 1st tutorial of the year and I wanted it to be a fun one instead of an ordinary neutral eye :) and I love the results. I hope you like it as well. Here's a list of products that I used..
*EYES*
-Too Faced Shadow Insurance
-NYX Jumbo Eyeshadow Pencil in Milk
-Ulta eye shadow in Couture Pink
-Ulta eye shadow in Granite
-NYX matte black eye shadow
-ELF liquid eyeliner
-Sally Girl loose glitter in Fuchsia-licious
-Maybelline Falsies Mascara
*FACE*
-Rimmel Fix & Perfect primer
-Sally Hansen Your skin make up Creamy Beige
-Maybelline dream Mousse concealer
-Sephora Mineral Compact Foundation Tan
-Stila Bronzing powder Shade 02
-NYX blush in Mocha
*Lips*
-Revlon Primrose lipstick
Here is the video, don't forget to subscribe ;)

xoxo Karen,

Tuesday, January 3, 2012

DIY: Nail Polish Rack

Hello :) So last week I made this nail polish rack, it takes awhile to make and patience but it is worth it. It was very cheap to make. Here is what I used
-hot glue gun ($2.39 at walmart)
-glue sticks ($1.17 at WalMart)
-Exacto Knife ($2.47 walmart)
-3 foam boards ($1 each Dollar Tree)
total cost $9.03 :)
So here's what I did
On the 1st board draw a horizontal line every 5 inches, this will be the back on the rack
On the 2nd board cut 7 TWO inch strips (horizontal) (these will be your shelves)
 then cut 7 ONE inch strips ( horizontal) which will prevent your nail polishes from sliding off the shelves

Finally on the 3rd board cut TWO  2 1/2 inch strips which will be the sides of your rack.
I glued the 2 inch strips on my 1st board which had the 5 inch spacing :)
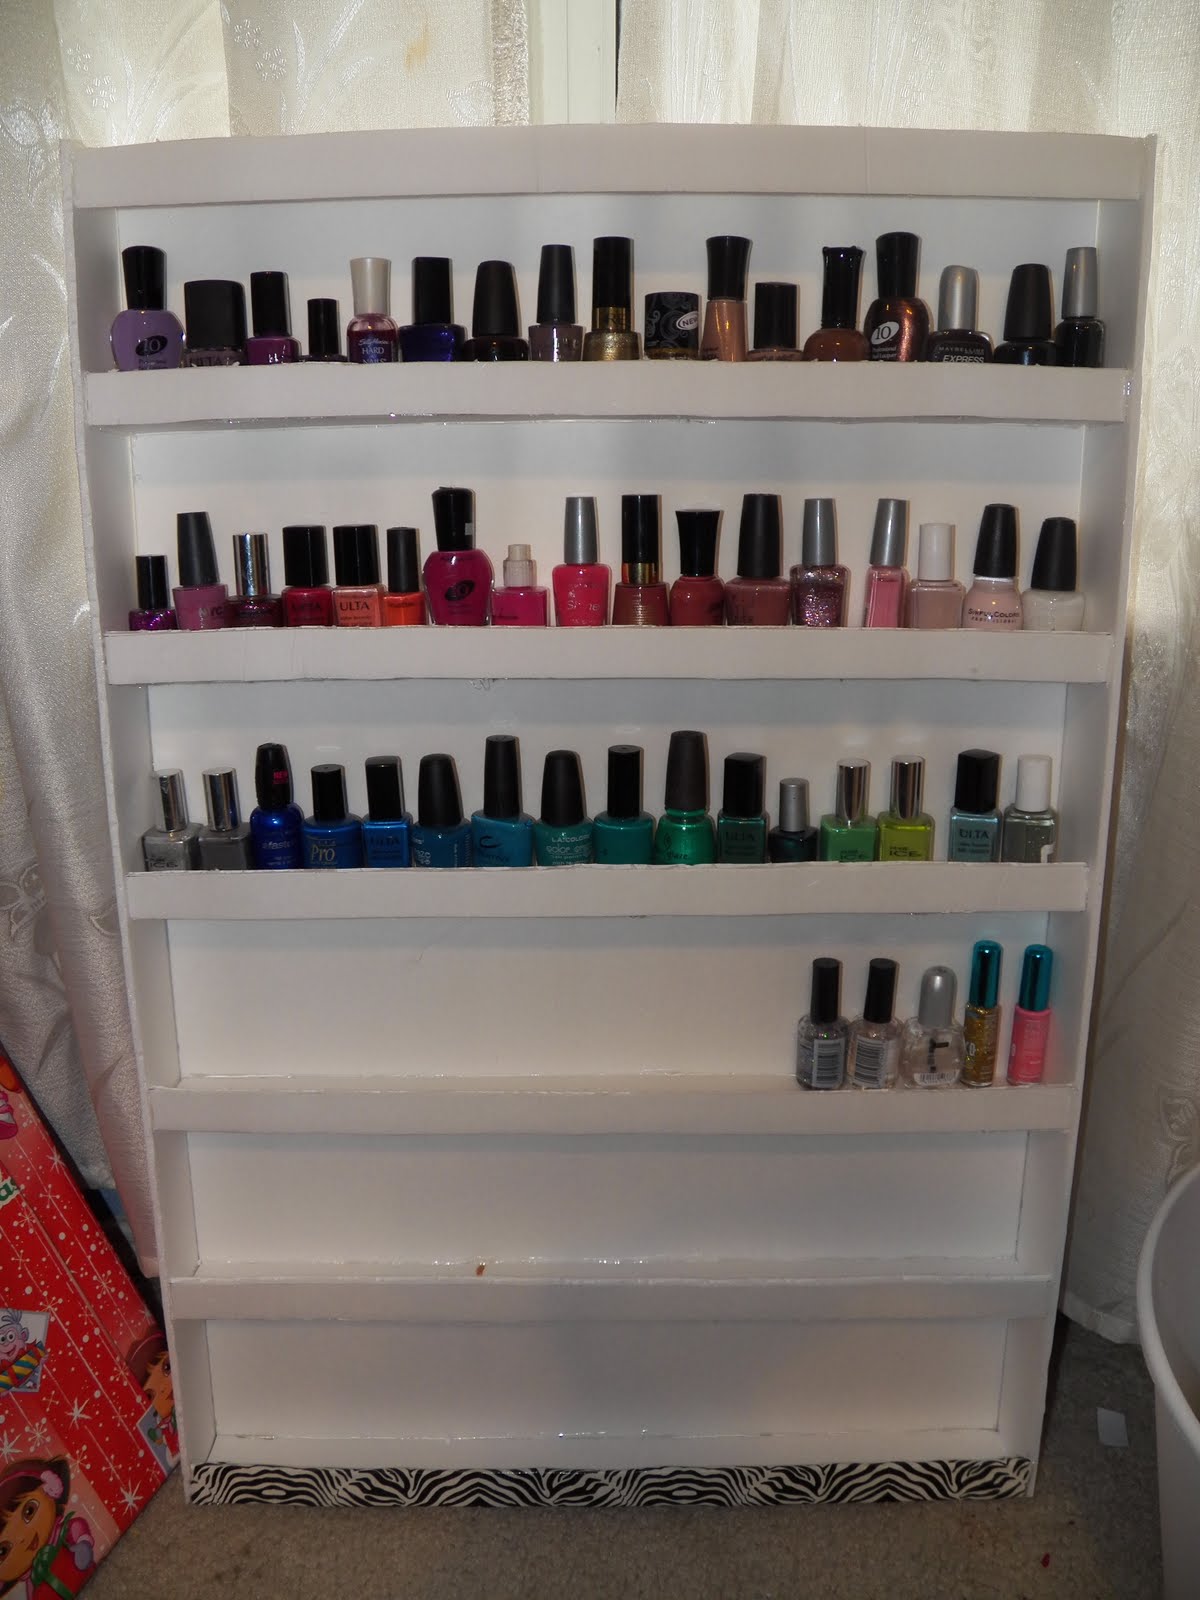
then I glued the 1 inch strips on the edge of the 2 inch strips to close them and prevent my nail polishes from sliding off the shelves. Last, I Glued the 2 1/2 inch strips on the sides of the rack to make a box and keep my polishes in place and here is the result :)
I hope I explained well, I would've liked to make this black but I didn't find enough black foam boards :(. And you can also decorate it with pattern tape or animal print one it would look great ;)
I hope you enjoyed this post, have a wonderful day
xoxo Karen,