#1 flowy chiffon blouses!!! in any color or print, specially now with my growing belly, these are so comfortable and fresh and they are so easy to dress up or down ;)
#2 Animal print leggings or jeans :D leggings are the best thing for me to wear because they are comfortable and make my little man not kick so much around my bladder lol
hello there ladies I've been mia for so longg, but I went out of town for awhile and now I'm finally back home, trying to film new videos and outfits that I would like to post. Also I am 27 weeks pregnant with my 2nd child : D a baby boy and I'm exciting getting things ready for him but also trying to spend as much time as possible with my daughter since in a few months she will not be my only child anymore and she will have to share mommy. So I have a lot going on but I havent forgotten my lovely blog. Add me on instagram since its so much easier to share things Im up to Kmanzo01. I hope everyone is doing well and come back soon :)
Hello So I am finally back with a new post :) and this one is actually very exciting..at least for me haha
I already made a video about this product on my YouTube channel a couple of weeks ago but I also wanted to have one on my blog...so here it goes
The Revlon Colorstay Whipped Creme Makeup is new and I had no idea it was out until the day I saw it at CVS and decided to buy it. It is more expensive there (I paid $13.49 for it)
The first thing I noticed is that they didn't have that many shades to chose from so I went for the darkest one they had on display which is 400 early Tan. I used the Colorstay liquid foundation in Early Tan so I figured it was probably similar, but not, this one is actually darker and more of a neutral shade which bothers me a bit but not enough for me to not use it.
I wish it was more yellow but it still works. The Packaging is a bit different than what I am used to have but it is very convenient due to the fact that the foundation is thick. It is glass and it had a little plastic top that annoys me so I threw it away
Like it??
YES!! not only do I like it, I LOVE IT! my skin type is normal to combination, some foundations can make my t zone ridiculously oily...not this.
why?
Well it is very different, it is thick but not nasty thick that makes it hard to work it. It is very blendable and gives me a nice coverage. I say its light to medium coverage depending on how much you apply, and it claims to be buildable to full coverage...I personally haven't tried that because I am pleased with one layer of this foundation. It also claims to last 24 hrs? now, I don't know about that, but it has lasted up to 10 hrs on my face. Once I apply it I don't have to touch up with powder throughout the day which I love because I don't carry a makeup bag with me.
How I apply it:
Well I always use a primer, then I dot it all over my face and blend it with the ELF studio powder brush (flat top) I use a bit of the Rimmel Stay Matte powder to set it and I am good to go.
Final thoughts:
I have noticed that I do not get shiny at all with this foundation, my makeup looks good even when I am outside in this nasty humid weather in Texas. Like I mentioned, I don't have to touch up and it is long lasting.
I am very happy with it and has quickly become my favorite foundation. Other things I'd like to mention is that this foundation doesn't seem to oxidize on me and also it doesn't really transfer which is also a plus. It doesn't look cakey and gives like a natural matte finish, my favorite and it didn't break me out, but then again nothing really does.
Anything bad?
its not yellow enough...that is it in my opinion.
I personally enjoy this foundation and I hope you do too if you decide to purchase it.
I hope I didn't leave anything out and if you have any questions, leave a comment.
If you'd like to see the video I did about this and see how I apply it, then check it out below.
I haven't updated my blog in months and months...so it feels like it and now I am really feeling like blogging again! There is a few things going on in my life now and I am excited for the changes to come :)
One of the changes going on is that I am expecting my 2nd baby!!! I am 11 weeks at the moment and I am due in December. My daughter is sooo excited to be a big sister and its a blessing. I have been uploading some videos on my YouTube channeland I am currently working in some posts for here. I gotta take some pictures in order to be able to make these post available to you all :D
I will definitely be blogging and hope to bring tons of cool stuff .
Helloo! So today I will be doing a review on a products that I have been enjoying, and it is the Monistat chafing relief powder gel, but I'm reviewing it as a PRIMER ;) you will find this at your local drugstore of Wal mart, Taget etc..in the feminine care isle
For a while I have been watching videos on YT and a few girls said really good things about this products used as a primer so for some time I wanted to get it but wasn't to interested until I finally felt that I really wanted to try it. Some people have a hard time finding this so they order it online, but I found it at my local Wal Mart for $5.95. I started using it the day after I bought it and here are my thoughts.
The Good:
This products has worked good for me. You need a very small amount and it distributes evenly all over my face. It feels very silky and smooth. It doesn't leave my face oily, it actually feels exactly the same as when I apply any other primer, like the Sephora primer, which was what I had been using. It is almost clear and has absolutely no smell to it which is great. My foundation blends great on top of this and it hold up well throughout the day. I do not get oily which is AWESOME. I have not broken out with this, but then.. nothing really makes me break out as of now (thank GOD)
on the left Sephora Primer, right Monistat Gel
I also really like the packaging and the way I'm able to control how much product I use. It is not runny. The gel comes in a tube with 1.5 OZ which will last a long time, since like I mentioned you really don't need to use much ;)
The bad??:
I don't have anything bad to say about this product, honestly I am very happy with it. the thing that might be bad for others is the fact that this has absolutely no benefits to your skin, which is obvious. this product is not made for the face, and it is not a primer, but it doesn't mean you can't use it as one. This is good if you want a basic primer with basic functions, like a product that is going to work as a middle layer between skin and makeup, and a product that will make your foundation blend nice and even, and that will help it last longer.
I hope you find this to be helpful and don't forget to share your thoughts.
Let me know if you have tried it.
xoxo Karen,
1.Loreal true match W5
2.Maybelline Dream Nude Airfoam Foundation Sun Beige
3.Rimmel Stay Matte Powder
4.Stila bronzing powder Shade 02
5.MAC Blacktrack Fluidline
6.Sally Girl e/s Chocolate
7.MAC Desert Rose blush
8.Too Face Shadow Insurance
9.MAC lipstick in Modesty
10.Rimmel Match Perfection Concealer in Medium
Today I put up a video after almost 2 weeks, and I decided to do the Project 10 Pan.
I have been buying make up that I end up not using so I think its time to finish up some products before buying more. The last thing I bought was the Viva Glam Nicki lipstick and that is it! I am so tempted to go and buy stuff specially since I got the ULTA ad in the mail but I gotta pass on it and I also cant watch haul videos because then I will feel like shopping. lol I sound like an addict but honestly is not that bad, I really have to finish what I have before I have to get rid of it. I will update in 2 weeks and we will see how it goes.
Have you tried this?
Hi there, so I decided to film a tutorial showing you how I use the Maybelline Color Tattoo Eye Shadow in Fierce & Tangy. I love this color and it looks really good with brown, but I wanted to switch it up a tiny bit, because I am always using brown eye shadows. I really like how this looks. May not look to appropriate for the weather right now, but spring is coming up and it will be perfect then :D.
I hope you enjoy this look, and I will list all the products I used to create it.
*Products used:
+Too Faced Shadow Insurance
+Maybelline Color tattoo e/s Fierce & Tangy
+NYX trio in Shangri La
+Cover girl Quad in Coffee Shop
+MAC Blacktrack Fluidline
+Maybelline The Falsies Mascara
+Revlon Mineral blush *Honey
+ELF studio blush Pink Passion
+Tarte Highlight
+Revlon l/s *Just Enough Buff
**FACE**
+Monistat gel (as primer)
+Revlon color stay in Golden Caramel mixed with Almay clean complexion makeup in Neutral (to get right shade for me)
+Loreal True Match powder in W6 sun beige
Hello lovelies :) so I've bought a few things in the past days and wanted ot share some swatches with you all, I hope you enjoy :D
First I will start with nail polishes, I must admit I've been a bit out of control with them..
from left to right Sinful Colors *Cinderella* Revlon *Chic* Wet n Wild *I Need a Refresh-mint*
From left to right Revlon *Popular* Wet n Wild *Candy-licious* Wet n Wild *Through The Grapevine*
I finally Have all the shades I wanted!! Maybelline Color Tattoo 24hr Eye Shadows are the bomb! no joke!
From left to right Tenacious Teal, Edgy Emerald, Fierce & Tangy, Pomegranate Punk, Tough as Toupe
I also got my 1st Revlon lipgloss,and the color I chose is Pink Pop :)
I love this eye shadow, its called Nude Slip and its perfect for everyday, nice and pigmented :D
This product is a Mineral Blush from Revlon in Honey, and this color is great for those days when I don't want to contour and add blush, this does the job of both ;)
I also bought the Loreal True Match Powder in W6 sun Beige, I remember this powder being my go to powder for awhile then I started using others but I wanted to use it again and I'm excited to start using it :D.
So far I am pleased with all this products, so I'm pretty sure they will not make it to a products I regret buying post.
I hope you enjoyed and have a wonderful day :D
xoxo Karen,
Hello lovelies, today I have a very exciting post for you all, well at least I think this is exciting lol, I love anything DIY and a few days ago I made some bracelets that I think are super cute and fun.
It is super EASY to create this bracelets and the best part is that you can switch up your materials and create something according to your taste ;) so lets get started..
what you will need.
all you see is a regular 3 strand braid, but you put a bead on strand #1, which of course becomes strand #2 when braiding, then a bead on strand #3, which also becomes strand #2 when braiding.
Before reaching your desired length, make another 1 or 1/12 inch braid (depends on your desired length) then make double knot, (big enough to fit in the loop you did at the beginning) and not come undone when you wear it.
I hope you enjoyed this super easy DIY bracelet, and if you get a chance to try it out don't forget to share, or tweet me a pic @Kmanzo01
Have an awesome day
xoxo Karen,
helloooo lovelies. So I am at almost 100 followers, and that is a lot to ME being that I don't update my blog as often and I haven't been able to post content I'd like, but I am going to try my best to make my blog more fun ;) and I am at 97 followers and this month completes my 1st year of blogging. Time went by crazy fast!!!!! So I will have a GIVEAWAY within a week or two to celebrate this :D I hope a lot of you enter it when is up. So I am going to buy a couple more things so I can have a nice GIVEAWAY. Thank you so much to all you who have followed me and like my blog. I love you all!!!! hugs and kisses, and check back soon for my GIVEAWAY post ;)
have a wonderful day
xoxo Karen,
Hello everyone ;) so a few days ago I stopped by the local Target and I saw a few new makeup displays and when I see new I get excited lol. So I love maybelline and I saw a new foundation they came out with which is the Dream Nude Airfoam foundation. I couple of weeks ago I saw the new mousse foundation from Revlon but honestly I hear people say you can see small shimmers in that foundation and I really dislike that so I gave the maybelline foundation a try. I paid $8.99 for it and the shade I chose is #265 Sun beige which at first I wasn't sure if I should get because since its a metal container you can't see the actual product. Well I am glad I chose that shade because it matched me perfectly and that comes as a surprise because it's hard to find a drugstore foundation that matches my skin that good, I have a lot of yellow undertones. I applied this foundation using the ELF powder brush, which is the flat top one, and it was the best choice. That brush allowed me to blend the foundation onto my skin really well. the foundation is super easy to work with and it's really cool because it's a mousse. It gives a nice natural finish, not to matte or dewy which I like because I m not a big fan of dewy foundations. The weather definitely allows me to use different foundations because during summer time I have to stick to the Revlon Color Stay for a good matte finish and because it is long lasting. The Dream Nude Airfoam foundation lasted a good 8 hrs on my skin, I didn't touch up with powder throughout the day, which I was surprised about that but it's a plus.
Before applying this foundation I made sure to exfoliate my face because flakiness would look horrible specially with this type of foundation. I also don't have acne scars (or acne)and I also don't have many blemishes to cover. this foundation is light and great for everyday use...(so far) it feels like it. My skin is not sensitive so I highly doubt this would make me break out, but I will update for any changes :)I feel as if it does a good job at evening out my skin tone and helping my skin look healthy. I hope my initial thoughts don't change, but for now I think this will be my every day foundation. Have you tried it?
Don't forget to check my new video where I talk a bit about it and also show how I applied it.
Hello everyone today I decided to film my 1st tutorial of the year and I wanted it to be a fun one instead of an ordinary neutral eye :) and I love the results. I hope you like it as well. Here's a list of products that I used..
*EYES*
-Too Faced Shadow Insurance
-NYX Jumbo Eyeshadow Pencil in Milk
-Ulta eye shadow in Couture Pink
-Ulta eye shadow in Granite
-NYX matte black eye shadow
-ELF liquid eyeliner
-Sally Girl loose glitter in Fuchsia-licious
-Maybelline Falsies Mascara
*FACE*
-Rimmel Fix & Perfect primer
-Sally Hansen Your skin make up Creamy Beige
-Maybelline dream Mousse concealer
-Sephora Mineral Compact Foundation Tan
-Stila Bronzing powder Shade 02
-NYX blush in Mocha
*Lips*
-Revlon Primrose lipstick
Here is the video, don't forget to subscribe ;)
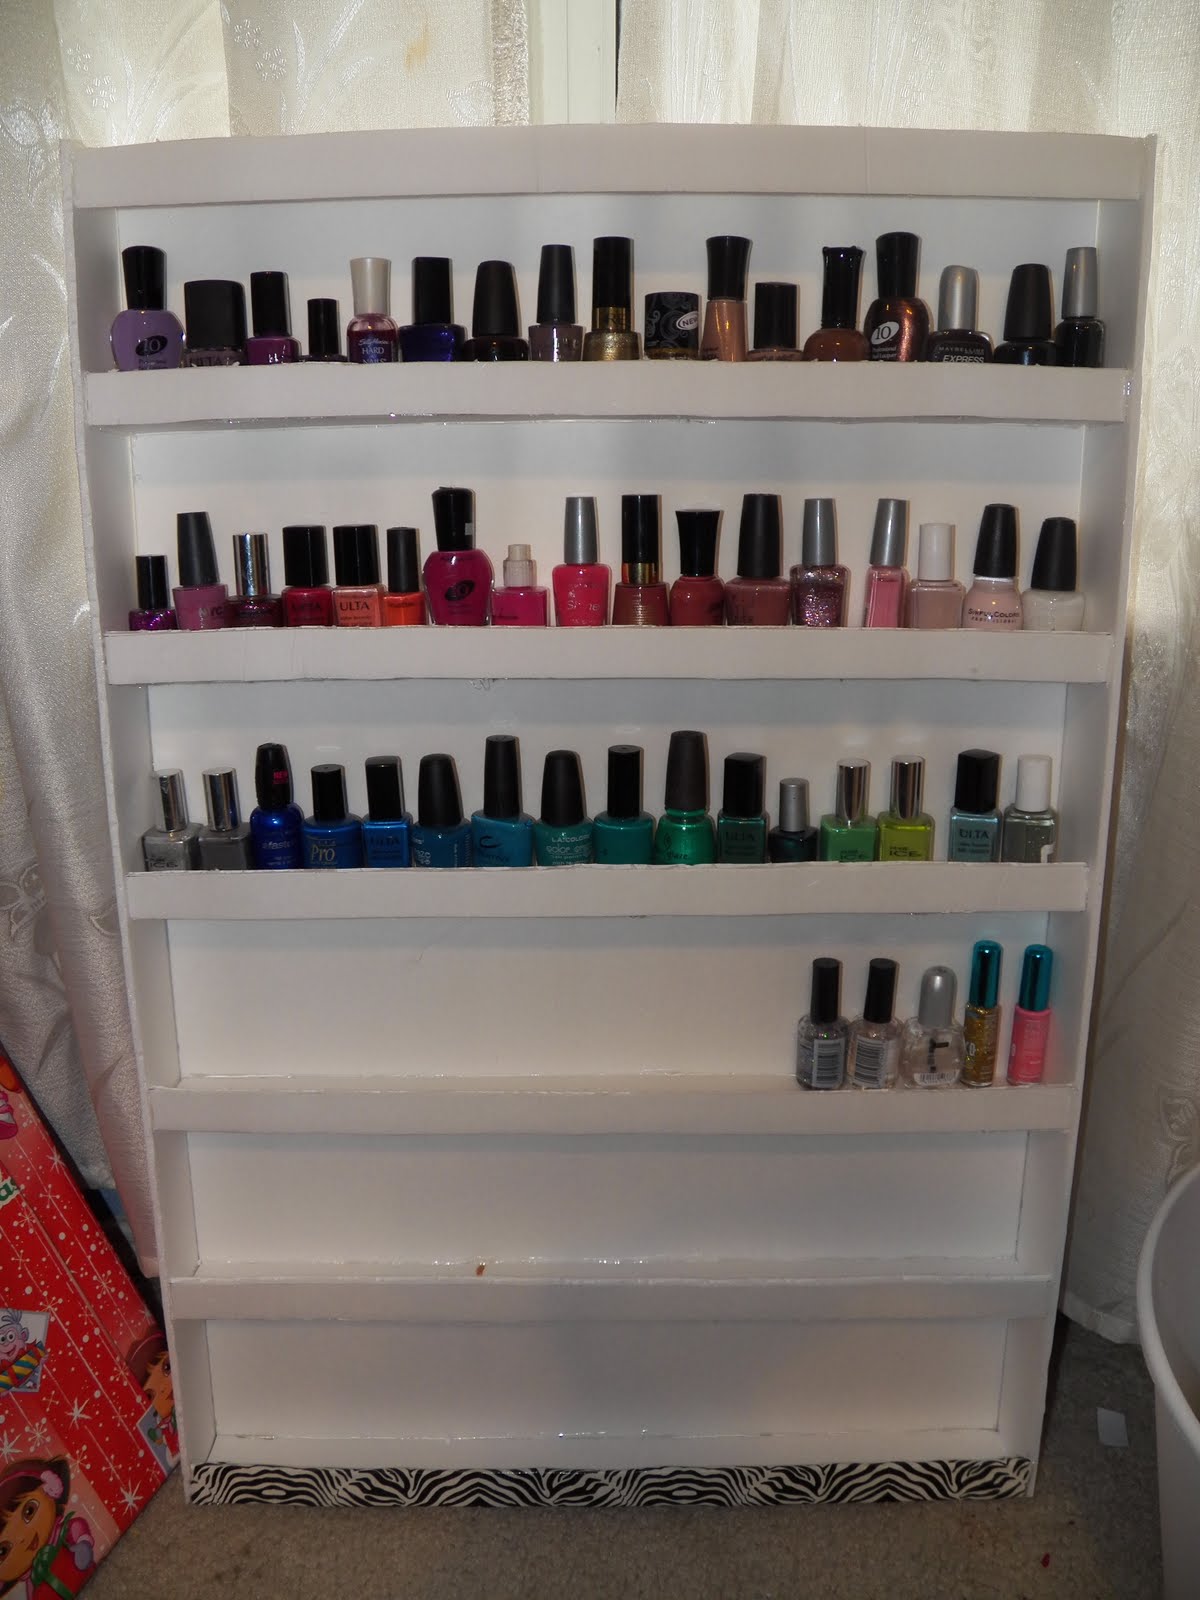
Hello :) So last week I made this nail polish rack, it takes awhile to make and patience but it is worth it. It was very cheap to make. Here is what I used
-hot glue gun ($2.39 at walmart)
-glue sticks ($1.17 at WalMart)
-Exacto Knife ($2.47 walmart)
-3 foam boards ($1 each Dollar Tree)
total cost $9.03 :)
So here's what I did
On the 1st board draw a horizontal line every 5 inches, this will be the back on the rack
On the 2nd board cut 7 TWO inch strips (horizontal) (these will be your shelves)
then cut 7 ONE inch strips ( horizontal) which will prevent your nail polishes from sliding off the shelves
Finally on the 3rd board cut TWO 2 1/2 inch strips which will be the sides of your rack.
I glued the 2 inch strips on my 1st board which had the 5 inch spacing :)
then I glued the 1 inch strips on the edge of the 2 inch strips to close them and prevent my nail polishes from sliding off the shelves. Last, I Glued the 2 1/2 inch strips on the sides of the rack to make a box and keep my polishes in place and here is the result :)
I hope I explained well, I would've liked to make this black but I didn't find enough black foam boards :(. And you can also decorate it with pattern tape or animal print one it would look great ;)
I hope you enjoyed this post, have a wonderful day
xoxo Karen,


 Hello lovelies :) so I've bought a few things in the past days and wanted ot share some swatches with you all, I hope you enjoy :D